DIY PC Build Guide 2026: High-Performance Gaming Rig Under $1500
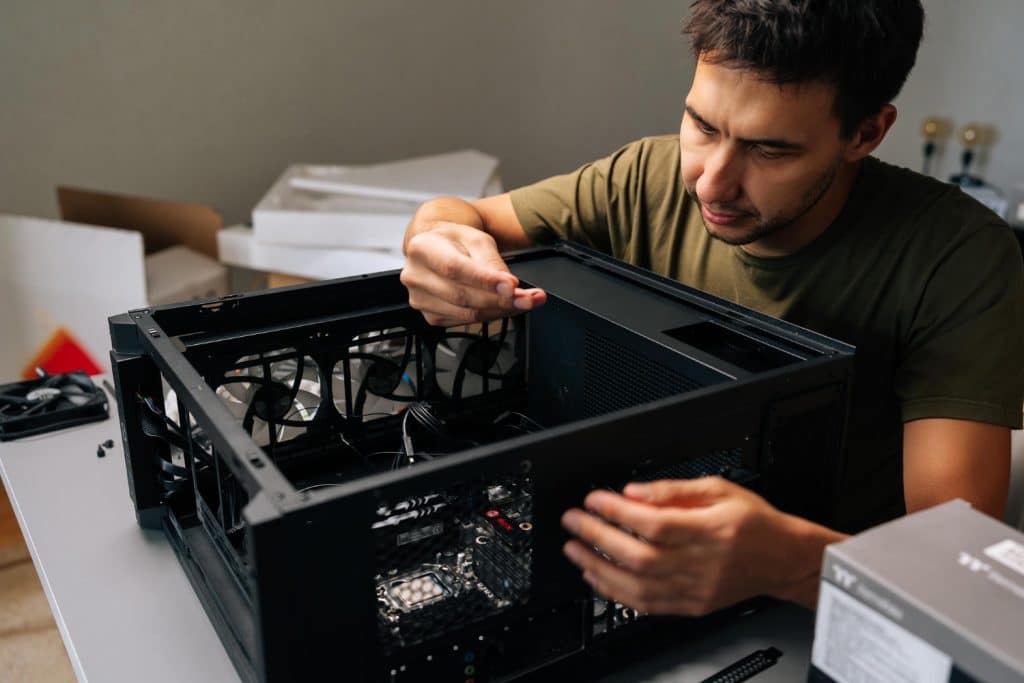
Ready to level up? This DIY PC Build guide is your ultimate shortcut to crafting a powerhouse machine that dominates 2026’s most demanding titles without draining your savings.
Forget the complexity of modern hardware; we’ve distilled the assembly process into a streamlined, three-hour mission. By selecting the right silicon and storage, you’ll unlock elite frames for under $1500.
Whether you’re a first-timer or a seasoned tech enthusiast, this walkthrough simplifies every component installation and system optimization. Let’s turn that pile of boxes into a high-performance battle station.
Planning Your High-Performance DIY PC Build 2026
Effective planning is the cornerstone of any successful PC build, especially when aiming for high performance on a strict budget. Identifying your gaming needs and understanding component compatibility will save time and prevent costly mistakes.
Before purchasing any parts, research current hardware trends and pricing to maximize your dollar-to-performance ratio. This initial phase dictates the overall success of your DIY PC Build 2026, ensuring you select components that work harmoniously.
Setting a clear budget and adhering to it is critical for staying under the $1500 target while still achieving high-performance benchmarks. Prioritize components that directly impact gaming performance, such as the CPU and GPU, when allocating funds.
Component Selection for Optimal Performance
Choosing the right components is where the real strategy for a high-performance DIY PC Build 2026 begins. Focus on a balanced system where no single component bottlenecks the others, ensuring smooth gameplay and efficient operation.
For a gaming rig under $1500, a mid-range to high-end CPU and a capable GPU are non-negotiable.
Look for processors from Intel or AMD that offer excellent multi-core performance for gaming and multitasking, paired with a graphics card that can handle modern titles at high frame rates.
- CPU: AMD Ryzen 5/7 series or Intel Core i5/i7 (latest generations) for strong gaming and productivity.
- GPU: NVIDIA GeForce RTX 3060/4060 series or AMD Radeon RX 6700/7700 XT for 1080p/1440p gaming.
- RAM: 16GB (2x8GB) DDR4 or DDR5 at 3200MHz+ for responsive multitasking and gaming.
Budgeting Smart for Your Gaming Rig
Adhering to a $1500 budget requires careful consideration of each component’s cost versus its performance contribution. Don’t be tempted by overly expensive parts that offer marginal gains; instead, seek out the best value.
Consider waiting for sales events like Black Friday or Prime Day to secure better deals on critical components. This proactive approach can significantly reduce the overall cost of your DIY PC Build 2026 without compromising performance.
- Storage: A 1TB NVMe SSD for fast boot times and game loading, supplemented by a larger HDD if additional storage is needed.
- Motherboard: A B-series chipset for AMD or Intel, offering essential features without unnecessary premium costs.
- Power Supply: A reputable 650W-750W 80+ Bronze/Gold certified PSU to ensure stable power delivery and efficiency.
Gathering Tools and Preparing Your Workspace
Before embarking on your DIY PC Build 2026, ensure you have the necessary tools and a clean, organized workspace. A well-prepared environment prevents frustration and potential damage to components.
Having the right tools readily available streamlines the assembly process, helping you stay within the ambitious three-hour build target. A magnetic-tip screwdriver set is particularly useful for handling small screws.
An anti-static wrist strap and an anti-static mat are crucial for protecting sensitive electronic components from electrostatic discharge (ESD). Never underestimate the importance of these preventative measures.
Essential Tools for Assembly
A basic toolkit is sufficient for most PC builds, but a few specialized items can make the process significantly smoother. Investing in quality tools will also serve you well for future upgrades and maintenance.
Beyond screwdrivers, consider having zip ties or Velcro straps for cable management, which improves airflow and the aesthetic appeal of your build. A small flashlight can also be invaluable for illuminating tight spaces.
- Magnetic-tip screwdriver set: Phillips head is most common.
- Anti-static wrist strap and mat: Essential for protecting components from ESD.
- Zip ties or Velcro straps: For efficient cable management.
Setting Up Your Workspace
A clean, well-lit, and spacious area is ideal for assembling your gaming rig. Clear any clutter from your desk or table to prevent components from getting lost or damaged.
Ensure your workspace is free of static-inducing materials like carpet, or take extra precautions with your anti-static gear. Good lighting is also critical for seeing small connections and reading labels.
Organize your components by type (e.g., CPU, RAM, GPU) and keep their original packaging nearby. This makes it easier to locate specific items and refer to manuals if needed during your DIY PC Build 2026.
Step-by-Step Assembly: The Core Components
The core of your DIY PC Build 2026 involves installing the CPU, cooler, RAM, and motherboard into the case. Precision and patience are key during these initial steps to ensure proper functionality.
Follow the manufacturer’s instructions carefully for each component, as specific procedures can vary between brands and models. Rushing through these steps can lead to errors that are difficult to diagnose later.
Double-check all connections and seating before proceeding to the next step. A loose component can cause boot issues or instability, so verification is crucial for a smooth build.
Installing the CPU and Cooler
The CPU is the brain of your gaming rig, and its installation requires careful handling. Align the CPU’s triangular marker with the corresponding marker on the motherboard’s socket before gently lowering it into place.
Once the CPU is seated, secure the retention arm. Apply thermal paste (if not pre-applied to the cooler) and then install the CPU cooler, ensuring even pressure for optimal heat dissipation. This step is vital for the longevity and performance of your DIY PC Build 2026.
Mounting the Motherboard and RAM
With the CPU and cooler in place, install the RAM modules into the designated slots on the motherboard. Ensure they click firmly into place, indicating a secure connection.
Carefully lower the motherboard into the PC case, aligning it with the standoffs. Secure the motherboard with screws, but do not overtighten them. Connect the front panel connectors (power, reset, USB, audio) according to your motherboard manual.
These connections can be tricky due to their small size, so take your time. Proper installation of these components ensures your DIY PC Build 2026 powers on correctly and interacts with your case’s features.
Integrating Storage and Graphics
Adding storage drives and the graphics card are critical steps that significantly impact your gaming rig’s performance and functionality. These components define your system’s ability to store games and render high-fidelity visuals.
Modern gaming PCs primarily utilize NVMe SSDs for their speed, but traditional SATA SSDs and HDDs still offer cost-effective storage solutions. Choose a combination that fits your budget and storage needs for your DIY PC Build 2026.
The graphics card, or GPU, is arguably the most important component for gaming performance. Handle it with care and ensure it’s securely seated in the primary PCIe slot.
Installing Storage Drives
For NVMe SSDs, locate the M.2 slot(s) on your motherboard, remove the tiny screw or latch, insert the drive at an angle, and then secure it flat. These drives offer incredibly fast load times for your operating system and games.
SATA SSDs and HDDs are typically mounted in drive bays within the case and connected via SATA data and power cables. Ensure these cables are routed neatly to maintain good airflow for your DIY PC Build 2026.
Properly installed storage ensures your system boots quickly and your games load without unnecessary delays. Confirm all power and data connections are firm before closing up the case.
Graphics Card Installation and Power
Locate the primary PCIe x16 slot on your motherboard, usually the top-most one. Open the retention clip on the slot, align your graphics card, and push it firmly but gently until it clicks into place.
Secure the graphics card to the case with screws. Connect the necessary PCIe power cables from your power supply to the graphics card. Ensure all pins are fully inserted to prevent power delivery issues.
The GPU is often the largest and heaviest component, so ensure it is well-supported. A properly installed graphics card is crucial for unlocking the full gaming potential of your DIY PC Build 2026.
Power Supply, Cable Management, and Final Checks
The power supply unit (PSU) is the heart of your system, providing electricity to all components. Proper installation and meticulous cable management are essential for system stability and aesthetics in your DIY PC Build 2026.
Mount the PSU securely in its designated bay, typically at the bottom or top rear of the case. Connect the main power cables to the motherboard, CPU, GPU, and storage drives, ensuring each connection is firm.
Effective cable management not only makes your build look professional but also improves airflow within the case, contributing to better cooling and overall system longevity. Take the time to route cables neatly.
Connecting the Power Supply and Cables
Connect the large 24-pin ATX power cable to the motherboard, and the 8-pin (or 4+4-pin) EPS cable to the CPU power header. Ensure these critical connections are fully seated.
Route PCIe power cables to your graphics card and SATA power cables to your storage drives. Use the case’s cable routing channels and tie-down points to keep cables out of the way of fans and airflow paths.
This organized approach to wiring is a hallmark of a professional DIY PC Build 2026. It prevents cable clutter and allows for easier maintenance or upgrades in the future.
Cable Management and First Boot
Once all components are connected, use zip ties or Velcro straps to bundle and secure cables behind the motherboard tray or in other discreet areas. A tidy interior is not just for looks; it enhances performance.
Before closing the case, perform a final visual inspection. Double-check all connections, ensure no loose screws are present, and confirm that fans are unobstructed. This diligence is key for a successful first boot of your DIY PC Build 2026.
Connect your monitor, keyboard, and mouse, then power on your system. If everything powers up and you see a display, congratulations! The hardest part is over, and you’re ready for software installation.
Software Installation and Optimization for Gaming
After successfully assembling your DIY PC Build 2026, the next crucial step is installing the operating system and essential drivers. This phase transforms your hardware into a functional gaming machine.
Windows 10 or Windows 11 are the most common choices for gaming, offering broad compatibility and performance optimizations. Ensure you have a valid license key and a bootable USB drive ready for installation.
Once the OS is installed, focus on installing the latest drivers for your motherboard, graphics card, and other peripherals. Outdated drivers can significantly hinder performance and lead to instability.
Operating System and Driver Installation
Boot from your USB drive and follow the on-screen prompts to install Windows. Choose your main NVMe SSD as the installation drive for the fastest boot and game loading times.
After Windows is installed, download and install the latest drivers from your motherboard manufacturer’s website. Pay particular attention to chipset drivers and network drivers to get online.
The most critical driver update for your DIY PC Build 2026 is for your graphics card. Visit NVIDIA or AMD’s official website to download the latest GPU drivers, which often include performance enhancements and bug fixes for popular games.
System Optimization for Peak Gaming Performance
Beyond drivers, several software optimizations can further boost your gaming performance. Adjusting Windows power settings to ‘High Performance’ ensures your CPU and GPU operate at their full potential.
Disable unnecessary background applications and services that consume system resources. Game mode in Windows can also prioritize gaming performance, dedicating more resources to your active game.
Regularly update your operating system and game clients. Developers frequently release patches that improve performance and address vulnerabilities, keeping your DIY PC Build 2026 running smoothly and securely.
Troubleshooting Common DIY PC Build Issues
Even with careful planning, sometimes issues arise during a DIY PC Build 2026. Knowing how to troubleshoot common problems can save you considerable time and frustration, getting you back to gaming faster.
The most frequent issues typically involve improper connections or incompatible components. A systematic approach to diagnosis is far more effective than randomly re-checking everything.
Always consult your motherboard manual for diagnostic LED codes or beep patterns, which can provide valuable clues about the source of a problem. These indicators are designed to help pinpoint hardware issues.
No Display or Boot Issues
If your system powers on but shows no display, first ensure your monitor is connected to the graphics card (not the motherboard’s integrated graphics ports, unless you’re using integrated graphics).
Reseat your RAM modules and graphics card to ensure they are firmly in their slots. Sometimes, a slight misalignment can prevent the system from booting correctly. Check all power cables, especially the 24-pin ATX and CPU power connectors.
If your DIY PC Build 2026 still won’t display, try booting with only one stick of RAM in the recommended slot. This can help isolate a faulty RAM module or an issue with a specific slot.
System Instability or Crashes
Random crashes or freezes often point to driver issues, overheating, or unstable overclocks. Ensure all your drivers are up-to-date and that your CPU and GPU temperatures are within safe limits using monitoring software.
If you’ve attempted any overclocking, revert to default settings to rule out instability caused by pushing components too far. A faulty power supply can also lead to intermittent crashes under load.
Running memory diagnostic tools can help identify issues with your RAM. For a stable DIY PC Build 2026, ensuring all components are operating correctly and within their specified parameters is essential.
Maintaining Your High-Performance Gaming Rig
Regular maintenance is crucial for keeping your DIY PC Build 2026 running at peak performance and extending its lifespan. Neglecting maintenance can lead to reduced efficiency and potential hardware failures over time.
Dust accumulation is a primary enemy of PC components, leading to overheating and fan noise. Periodically cleaning your system is a simple yet effective way to preserve its performance and reliability.
Software maintenance, including driver updates and operating system optimization, is just as important as physical cleaning. A well-maintained system provides a consistent and enjoyable gaming experience.
Physical Cleaning and Dust Management
At least every six months, open your PC case and use compressed air to blow out dust from fans, heatsinks, and other components. Pay special attention to the CPU cooler and graphics card heatsink.
Ensure your case fans are correctly oriented to create positive or negative air pressure, which helps manage dust intake. Dust filters on your case should be cleaned regularly to prevent dust from entering the system.
A clean interior is vital for efficient cooling, which directly impacts the performance and longevity of your DIY PC Build 2026. Overheating can lead to thermal throttling and reduced frame rates.
Software Updates and Health Checks
Beyond physical cleaning, regularly update your graphics drivers, motherboard chipset drivers, and Windows operating system. These updates often include performance improvements, security patches, and bug fixes.
Monitor your system’s health using software tools that track CPU and GPU temperatures, fan speeds, and disk usage. Anomalies can indicate potential issues before they become critical.
Performing regular malware scans and keeping your antivirus software up-to-date protects your system from malicious threats. A secure and optimized software environment complements the robust hardware of your DIY PC Build 2026.
| Key Component | Budget Recommendation |
|---|---|
| CPU | AMD Ryzen 5/7 or Intel Core i5/i7 (latest gen) |
| GPU | NVIDIA RTX 3060/4060 or AMD RX 6700/7700 XT |
| RAM | 16GB DDR4/DDR5 (3200MHz+) |
| Storage | 1TB NVMe SSD |
Frequently Asked Questions About DIY PC Builds
Yes, a $1500 budget is highly realistic for a high-performance gaming PC in 2026. Advancements in component manufacturing and competitive pricing allow for powerful mid-range CPUs and GPUs. Strategic shopping during sales can further optimize costs, ensuring a robust DIY PC Build 2026 that handles modern games effectively.
While challenging, a beginner can approach a 3-hour build time with thorough preparation and a clear guide. Pre-sorting components, having tools ready, and watching video tutorials beforehand significantly reduce assembly time. Patience and attention to detail are more important than speed for a successful initial DIY PC Build 2026.
Common mistakes include not using anti-static protection, improper CPU or RAM seating, forgetting to connect power cables, and inadequate cable management. Failing to update drivers post-OS installation is also frequent. Double-checking every connection and consulting manuals for your DIY PC Build 2026 can prevent these issues.
Cable management is crucial for optimal airflow, which directly impacts component cooling and overall system performance. Poor cable management can obstruct fans and create hot spots, leading to thermal throttling. Beyond performance, it significantly improves the aesthetic appeal and ease of maintenance of your DIY PC Build 2026.
After hardware assembly, installing the operating system (Windows 10/11), motherboard chipset drivers, and the latest graphics card drivers are essential. Additionally, an antivirus program and monitoring software for temperatures and performance are highly recommended for a stable and optimized DIY PC Build 2026 gaming experience.
Looking Ahead: The Future of Budget Gaming Rigs
The insights from this DIY PC Build Guide 2026 highlight a continuous trend towards more accessible high-performance gaming.
Component prices are expected to stabilize, and new technologies will likely push efficiency and power further, making budget builds even more potent.
Future developments in CPU and GPU architectures promise enhanced performance per watt, meaning less power consumption for greater graphical fidelity.
This will further empower enthusiasts to create powerful systems like our featured DIY PC Build 2026 within reasonable financial limits.
Keeping an eye on emerging component releases and market shifts will be crucial for anyone planning future upgrades or new builds. The goal remains consistent: maximizing gaming enjoyment without overspending, a philosophy central to the enduring appeal of the DIY PC Build 2026 approach.
